Designer
The designer allows you to design your user interfaces in the GUI designer and
add your GUI-handling code in Java.
It is a solution to the age old question of how to quickly create a GUI, but still keep it in
a form that is easily adjustable. And by easily adjustable I mean that even a Mac user (read; graphics
designer) can modify my GUI.
The UICollection is Free, and Open Source. You are free to use it in any product, commercial or otherwise. Just sent bug reports and patches back to us.
You all know the problem; your client wants a good looking application that does just what he needs. And he wants just something different the week after.
You also know that a client does not know exactly what he wants until he has seen the results on screen, and has played with the controls to see how it feels.
Using the workflow of UICollection allows you to create a rapid-prototype for your GUI in a matter of minutes.
this prototype can be used and asjusted all the way to the moment you deliver your application.
This is unique to the UIC approuch, all competition tries to tell you its wrong to use a prototype-GUI in
production code, we encourage you to do so!
This solution allows you to have all the features of a hand-coded UI, without the hard work
In order to grasp the workflow you should be aware of some terminology
commonly used in object oriented languages, UICollection uses these to create
highly maintainable user-interfaces.
| MVC |
Model-View-Controller, a design where the code is seperated into 3
different parts (classes) with a minimum of (programmatic) connections
between them, leading to the advantage that design changes in one does
not lead to design changes in the other parts. |
| Model |
Short for data-model. Classes that represent a simple interface to any
data-structure. A data structure can come from an external file or
from a simple hard-coded list and anything in between. A model
basically provides an interface to the data, and the implementation is
the only thing that changes when the data comes from a file or from a
database. In object-oriented languages we try to program to interfaces so
the users of the interface don't need to change if the implemtation changes,
in case of the model this means you can alter the code internally in the model
to read from a file or from a database without either the view or the controller
knowing about it. |
| View |
The user-interface part of an application. This is all the widgets you use to
display your data which is contained in the model. The view mirrors the model
since a boolean in the model will probably be shown as a checkbox in your view.
The logic that binds that boolean to the checkbox is stored in the controller.
|
| Controller |
The glue between the model and the view. Changes in the datamodel as
well as changes in the view will be copied to the other. This part of
the solution typically implements button handling, for instance. |
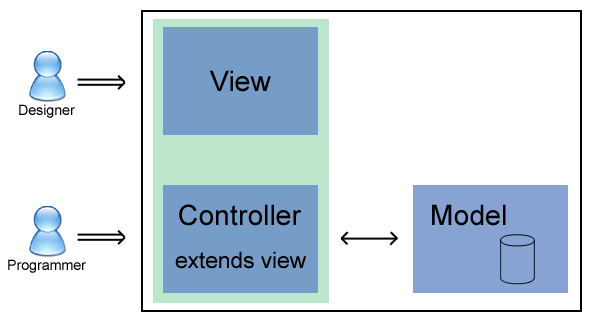
The graphics designer creates the view class (as displayed in the image above) by dragging and dropping
the widgets.
At compile time the visual data is converted to an actual java class file.
The programmer will extend the generated class and be able to add all controlling logic needed to
attach the view to the model. The programmer is also free to adjust things not possible in the designer
in this controller class.
Since the controller extends from the GUI building (view) class all widgets, models and other things
the programmer needs will be available as variables.
- First of all you need the Qt Designer. Linux users will find it in their distro, follow this link to get it for Windows
- In designer you will create your GUIs. All you need to know is explained in the documentation you got with Designer. Please take time to read at least the introduction here. You can stop reading after the 'Previewing' section on that page since the rest is not useful for our purposes.
- Name your widgets in the designer to names you wish to see in the resulting class. All widgets will be available as member variables, so you can change the content etc. in your implementation later on.
- Name the top-level widget after the class you wish to create.
- Save your designer file in your source tree. In a bigger project you will have a directory structure (also called packages). The designer fill should be named after the class you want the UICollection to create. For example the designer file can be
com\myproj\gui\AbstractOrderPanel.ui.
- Run the UICollection on the file using one of the two methods detailed below.
- Create a class that extends the auto-generated (abstract) class. An example implementation can be very simple;
public class MyGui extends AbstractGui  {
}
- You can provide your GUI handling code in the derived class. Things like placing data in your GUI, or acting on a button press are things that you will create methods for in the derived class. More on that in the tutorials.
- Compile your project as usual. Just make sure the graphics.jar is included in your classpath.
- Run your project as usual. Just make sure the graphics.jar is included in your classpath.
Note that the following tutorials were really written for an older version; most functionality should be
available, but better methods may be present in newer releases.
| Tutorial 1 -- a simple gui with user action |
| Webstart |
tut1.jnlp |
| PDF: |
Tutorial1.pdf |
| Sources: |
t1.zip |
| |
| Tutorial 2 -- shopping list |
| Webstart |
tut2.jnlp |
| PDF: |
not available, still has to be written |
| Sources: |
t2.zip |
| |
| Tutorial 3 -- shopping list version 2 |
| Webstart |
tut3.jnlp |
| PDF: |
not available, still has to be written |
| Sources: |
t3.zip |